I made the first batch alone as I didn't want to put anyone at risk for getting burned. Once I finished the first batch my confidence level soared as I realized that making soap is really not as hard as I had thought it would be. The more skills I learn, the more I find that sentiment to be absolutely true. I spend more time fretting over trying something than actually doing it when I finally start!
* As an important note - it is critical that you wear protective gear in case you get splashed with caustic soda (lye). Wear eye protection, a mask to protect your face and mouth, an apron, long sleeves and gloves.
Because I was very focussed on the steps, I didn't take many pictures of the actual process. I will next time. For now, I'll share what I do have on camera :)
My daughter helping to measure out the caustic soda on a scale. Accuracy is essential!
This is the first batch of soap after it cured for about 24 hours.
And here is the same batch all cut and ready to cure on a wire rack for 6 weeks.
This is a sign that I made up for the laundry room counter where the soap rests under a towel to slowly cool over 24 hours. We have a busy house and if I don't do that, someone will surely plop something down on my towel and ruin my soap!
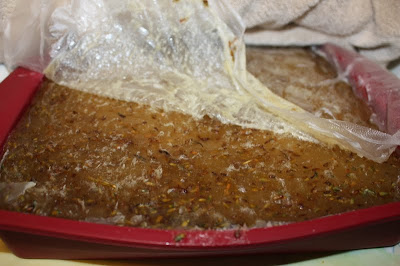
Here is the batch of lavender soap that we just finished this evening. At trace, we added some lavender and some essential oil. The soap has changed color (to this brown color) and has warmed up significantly during the hour it has sat under the towel. It will change color again as it cools and will eventually be creamy white with little lavender bits in it (we hope!).
All in all we LOVE making soap and so far my favourite part is the smell. I LOVE that I can smell fresh clean soap when the mixture is just starting to reach trace - it smells so nice and gentle but definitely like soap - natural, gentle, clean soap. I can't wait to try it and I don't know HOW I'm going to wait 6 weeks to do so!


What does the cost come out to? It looks like fun, but I'm wondering if the price is that much better. (of course, any comparison assumes that we can get supplies for about the same amount!)
ReplyDeleteBeautiful! I'll have to head over to rhonda's to read up on it. I've been itching to do it too. love,andrea
ReplyDeleteAs far as the cost, I need to look up my old receipt for the supplies and figure it out. It won't be very much. If you make soap with oils that are locally grown/available (or from rendered animal fat), then your cost will be far less. Using imported oils will increase the cost. From what I can tell, my main motivation for soap making will be the quality. After the residue in the mixing pot had cured overnight (and turned into soap), I filled the pot with water to use up that soap for washing some dishes. My word, the feel of it was out of this world! I've never felt such soft, luxurious soap ever in my life! I have sensitive skin and struggle with roseacea and dryness, so this soap will help alleviate those conditions.
ReplyDeleteSo after all that - if you have been thinking about making soap - DON"T wait as long as I did! Go to Down To Earth and get Rhonda's tried and true recipe and give it a go. You will love it and the end result.