I have a love/hate relationship with row covers. Without them, I could NOT grow brassicas so that fact certainly makes me love them BUT growing and maintaining plants under them is a royal pain! It's very inconvenient and somewhat time consuming - it's much easier to have plants uncovered so that you can see them every day and keep a close eye on when they are ready for harvest, not to mention keep the weeds at bay before they get too large.
The cabbage moths are terrible here and the larvae can destroy a massive brassica crop in just a few days. I've tried companion planting as repellant, delayed planting, early planting.... it doesn't matter what we do, they still come and we still lose everything if the brassicas are uncovered. Row covers are the ONLY way short of a massive hoophouse/greenhouse.

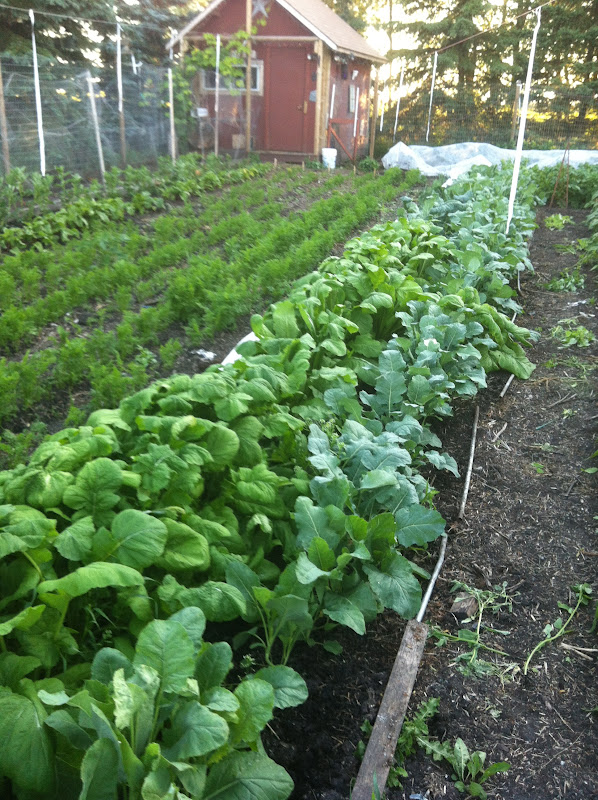
Here's what the row covers look like with mature plants
under them (not very attractive, I know...). Row covers are essentially a very lightweight fabric that is permeable to air and water. The come in different thicknesses which gives you greater degrees of frost protection if you are using them specifically to extend your season. That certainly can be a great help to us as out here in the country, as we often get frost before the end of August. You can buy them in different lengths - from 20' up to 250'. We buy 100' lengths as that's about the length of our garden but I have cut them up before to accommodate different garden layouts. They are re-usable from year to year if you take care of them to avoid tears and rips. They are quite durable, but they will snag on sharp objects (duct tape seals the rips on both sides quite successfully if needed).
And here's what's underneath to row covers! As you can see in the above picture, I use a collection of rebar, stakes and other poles to lay on top of the edges of the row covers. To remove the row cover, it's easy to simply roll/slide the poles off onto the soil away from the edge of the cover. You can barely see it, but the row cover is pulled back and tucked down to the left of the brassica rows. I always remove just one side of poles, and I pull back the cover to the opposite side. No sense removing both sides of poles - that's twice the work to get it all back in place. Once the cover is off, I can weed, thin rows, pick produce, re-seed between plants, and inspect the plants for damage. If we've had a lot of rain, mildew can grow on the leaves that are touching the soil, so I remove them if needed, but generally, things usually look pretty good under there. Weeds are always the worst problem for me but this year I'm on top of it (so far).
The timing of working under your row covers is crucial! You must wait for when the moths are inactive. VERY early morning and evening are good times. I prefer the evening because everything is dry. In the morning, dew makes everything wet. It's hard to work with the fabric when it's wet as it sticks to the plants and itself.
Tonight was perfect to work the brassicas - the kids were in the pool for an evening swim and the mosquitoes weren't too bad, so I dove right in and got busy. In 45 minutes, I had picked broccoli that was ready and checked on the plants that are close to harvest...


thinned out the snowball turnips and gave the greens to the chickens (I kept the turnips for us!),

checked on the succession plantings of broccoli seedlings that I put in a few weeks ago (they're coming along very nicely and will be producing soon),

and was mighty impressed with the purple top turnips!

I picked and thinned several pounds of them to bring in and gave those greens to the hens as well.


The Copenhagen cabbages looked fantastic! I seeded more of them this evening to keep the harvest going - I'm aiming to do that every 2 weeks with all of my crops until the beginning of August.

Kohlrabi is coming along nicely and will be ready soon... so tasty cut up and eaten raw (especially just picked!). The pac choi had all gone to seed, but we've been eating it for a few weeks... I've got more plants to go in shortly.
I've been terribly disappointed with cauliflower this year... my plants did NOTHING. Last year's crop was stellar.... so I'm going to try some fresh seed and see what happens. I suppose we must learn to take the good with the bad - never get too confident - gardens have a way of humbling us...
So all in all a productive 45 minutes this evening :) I have everything covered back up where it will stay for another 3 or 4 days. Now is the time of year when I need to be checking under there a few times/week. Early in the season, I can leave them for several weeks until the plants get established.
I bought my row covers online from Veseys and I've been very happy with their service. I have ordered row covers twice now from them and both times my order arrived very quickly.
Do you use row covers?
No, we don't - but I am going to look into it. Great idea. Your kitchen garden looks wonderfully productive. You just can't beat the taste of home-grown veg!
ReplyDeleteI had a terrible time with my kale this year and maybe if I use this technique next year, will have better luck..it is the first time I have heard of it. Love seeing all the things you are growing!
ReplyDeleteI think your row covers look neat. Your garden is beautiful! (It looks like a garden quality you'd see in magazines!) The rows are so neat and the health of the veggies is so nice! I really hate cabbage moths. I even tried spraying each with a pesticide, but it was a "green" pesticide and it did NOTHING! Then I tried to squish the moths with my hands but I was too afraid..ha...so I just hosed them with water and I know that did nothing to hurt them..oh well! love,andrea
ReplyDeleteElaine - thanks! It is productive but in a very utilitarian way. I am hoping to incorporate more flowers with it in the years to come... we have been focussing on renovations and food growing so far, but it's time to pretty it up a bit!
ReplyDeleteOnly in... - what happened to your kale? Mine grew without the benefit of cover but I'm curious what happened to yours...
Andrea - magazine quality it is not LOL - you may remember me lamenting earlier in the season about how messy and NOT straight my rows were... I had no time to fiddle with such things, but as the plants grew the lack of straight lines wasn't as evident, LOL As long as the plants grow I'm happy :) Try a row cover for your brassicas - it really works and it's not that expensive..
I have been wanting to try this...thanks for sharing your tips! Just picked our first broccoli for the season but no sign of the cauliflowers yet either unfortunate;y!
ReplyDeleteI am most envious of your garden...ours looks a little bare at the moment...happy harvesting!!!
Thanks, Jode - this is the calm before the storm... soon we will be canning, freezing and dehydrating like mad :)
ReplyDeleteWow, it's all looking fantastic. I'm planning on using them in the new vege patch - once its done, sigh!
ReplyDeleteWow, beautiful!! I've used row covers successfully over raised beds, mostly for bok choy. Last year I put netting over my cabbages to keep the moths out, but it only worked initially. It kept the destruction down a bit, but they found their way in eventually!
ReplyDelete-Jaime
Your garden is absolutely beautiful...the row covers, with your help, must be doing their job. This was my first year to have moths attack my young seedling in the green house. It is very disheartening when it happens. And, thank you so much for your kind words to me about my move from the farm.
ReplyDeleteSherri, you've got such a lovely productive garden. It all looks so healthy.
ReplyDeleteThank you Meggie and Rhonda :)
ReplyDelete